
Pro feature · WPConfigurator 3D Product Customizer 1.3.5 and later
A Range layer asks the customer for a number: a width, a length, a quantity. They set it with a slider, by typing it into a box, or both. The number can price the configuration on its own, or feed a Formula layer that works out an area, a perimeter or a band price.
Use a Range to:
- sell by size, such as a blind’s width or a rug’s length;
- sell by the metre, the kilo or the dozen;
- sell by quantity, with volume pricing;
- collect a measurement that a Formula turns into a price.
A Range sets a number and a price. It doesn’t resize or reshape the 3D model.
1. Turn on the Custom Fields module
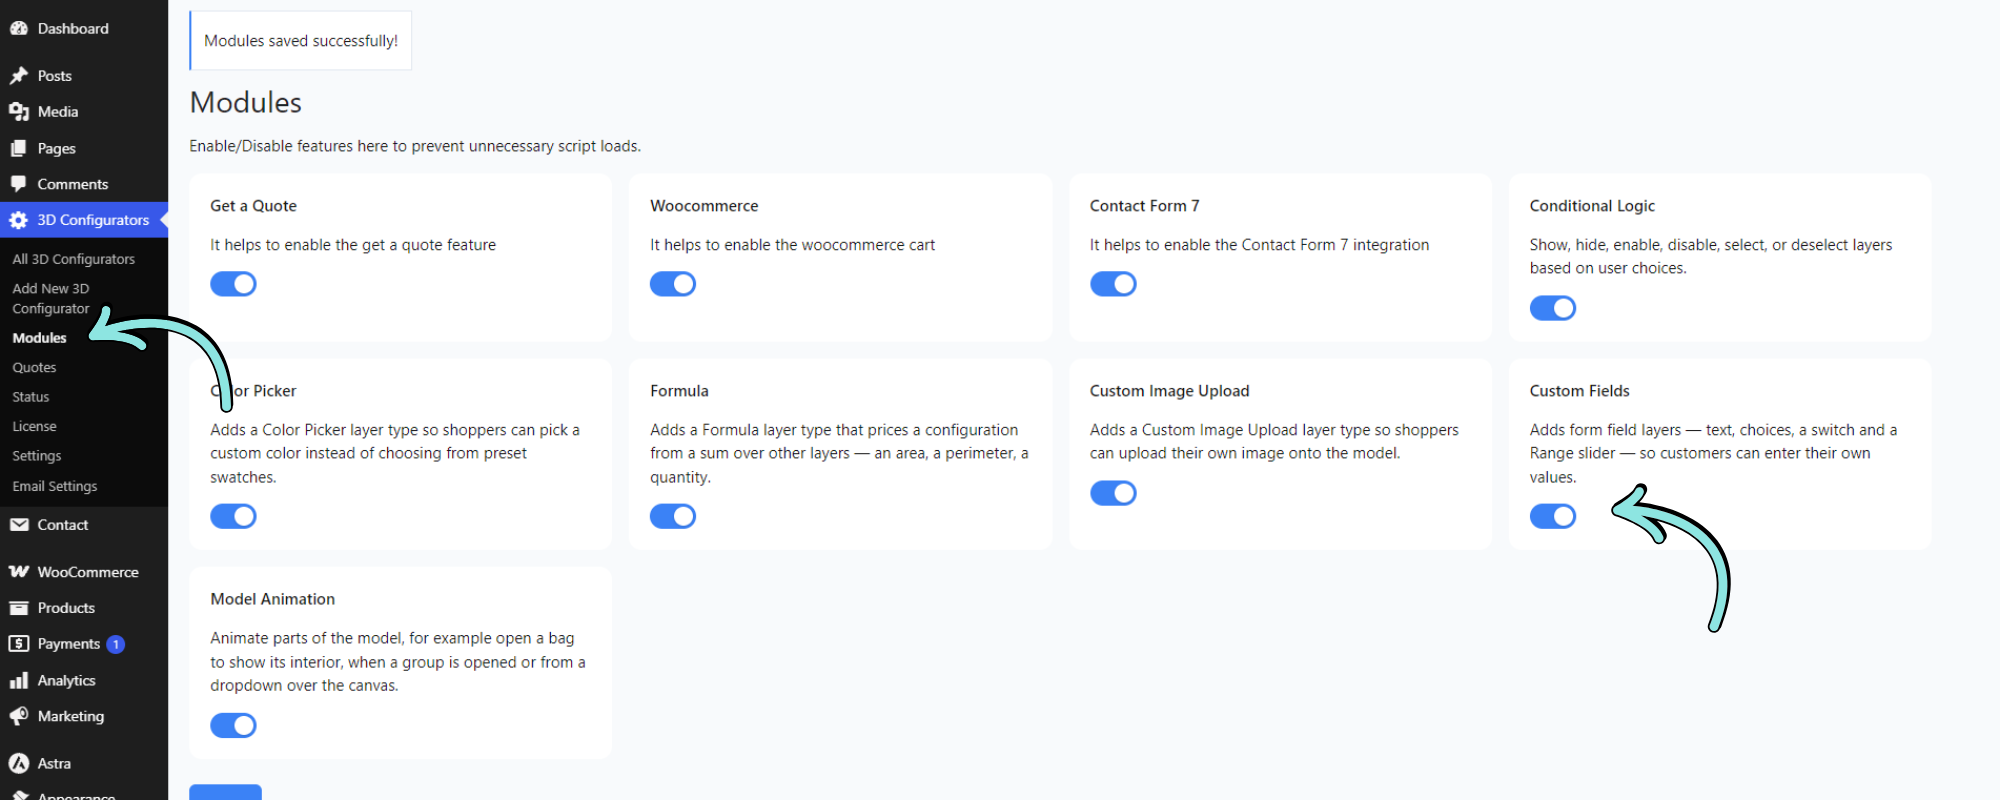
Range is one of the field types in the Custom Fields module. The module is off until you turn it on.
- In your WordPress dashboard, go to 3D Configurators → Modules.
- Find Custom Fields and turn it on.
- Click Save.
Range is now available in the editor, next to the other field types.
2. Add a Range layer
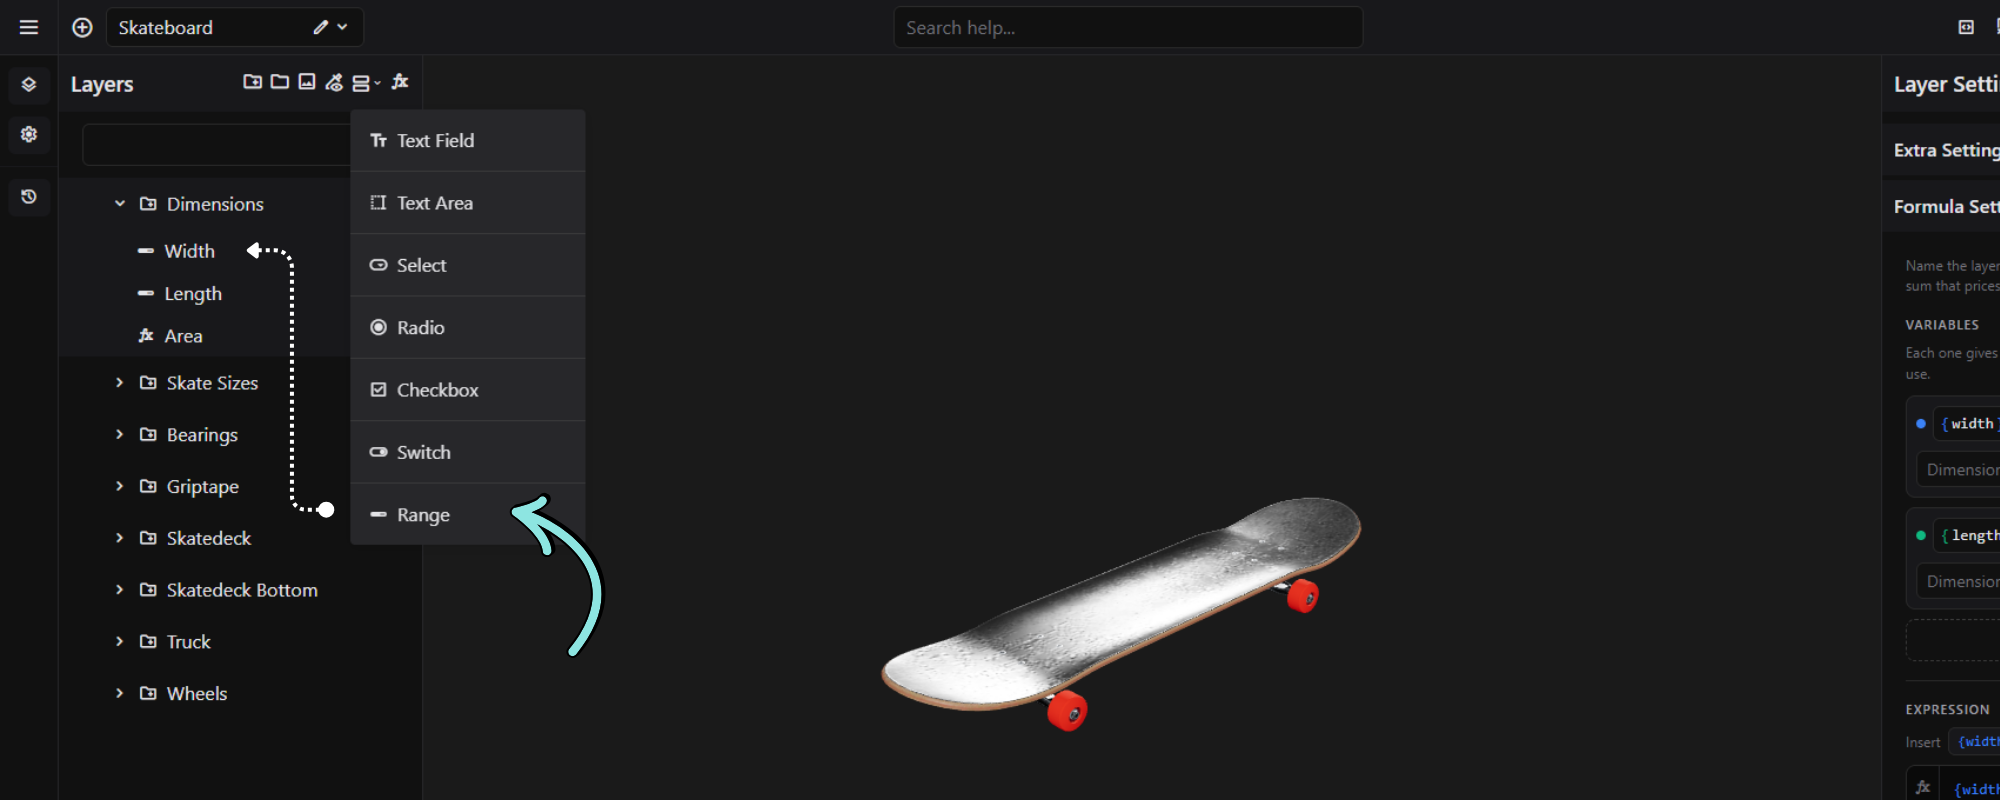
- Open your configurator in the editor, on the Model Structure tab.
- In the layer list, select the group the Range belongs in.
- Click the Range icon among the add-layer icons. Hover over an icon to see its name.
- A layer called Range is added to the group. Rename it, for example to Width.
- Select the layer. Its settings open in the settings panel.
A new Range runs from 0 to 100 in steps of 1, with a slider and a box.
Note: A Range has to sit inside a group or sub group. The editor won’t let you drop it at the top level of the layer list.
Tip: Name the layer for what it measures. The summary, the cart, emails and the PDF list a Range by its layer name.
3. Field Settings
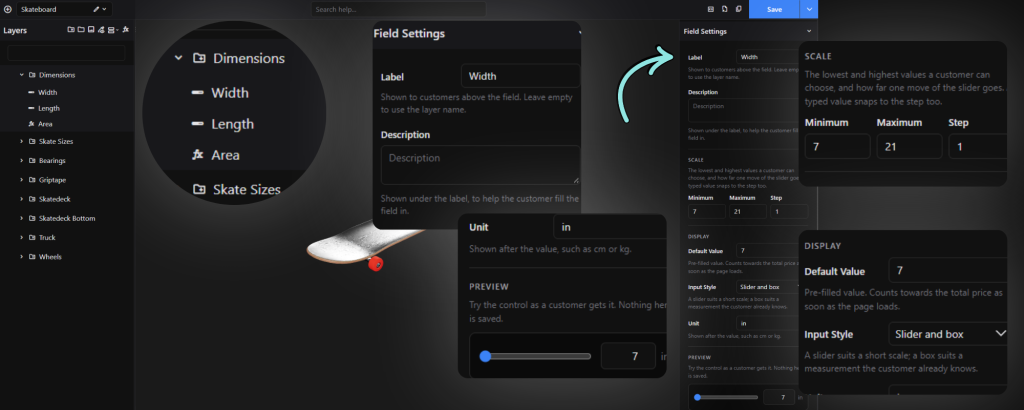
Field Settings is already open when you select a Range. It has four parts.
Label and Description
| Setting | What it does |
|---|---|
| Label | Shown to the customer above the control. Leave it empty to use the layer name. |
| Description | Shown under the label, to help the customer choose. Line breaks are kept. |
Scale
| Setting | What it does | A new Range |
|---|---|---|
| Minimum | The lowest value the customer can choose. | 0 |
| Maximum | The highest value the customer can choose. | 100 |
| Step | How far one move of the slider goes. A typed value snaps to it too. | 1 |
All three take decimals, up to 4 places, such as a Minimum of 7.25 or a Step of 0.5.
How the scale works:
- Steps count from the Minimum. A scale of 5 to 100 in steps of 10 offers 5, 15, 25 and so on, up to 95.
- A typed value moves to the nearest step. On that scale, 12 becomes 15.
- Values outside the scale are brought inside it. On a scale of 1 to 20, 99 becomes 20.
- The slider stops at the last step it can reach. On a scale of 0 to 100 in steps of 3, the slider stops at 99. To avoid this, make the distance from Minimum to Maximum a whole number of steps.
Display
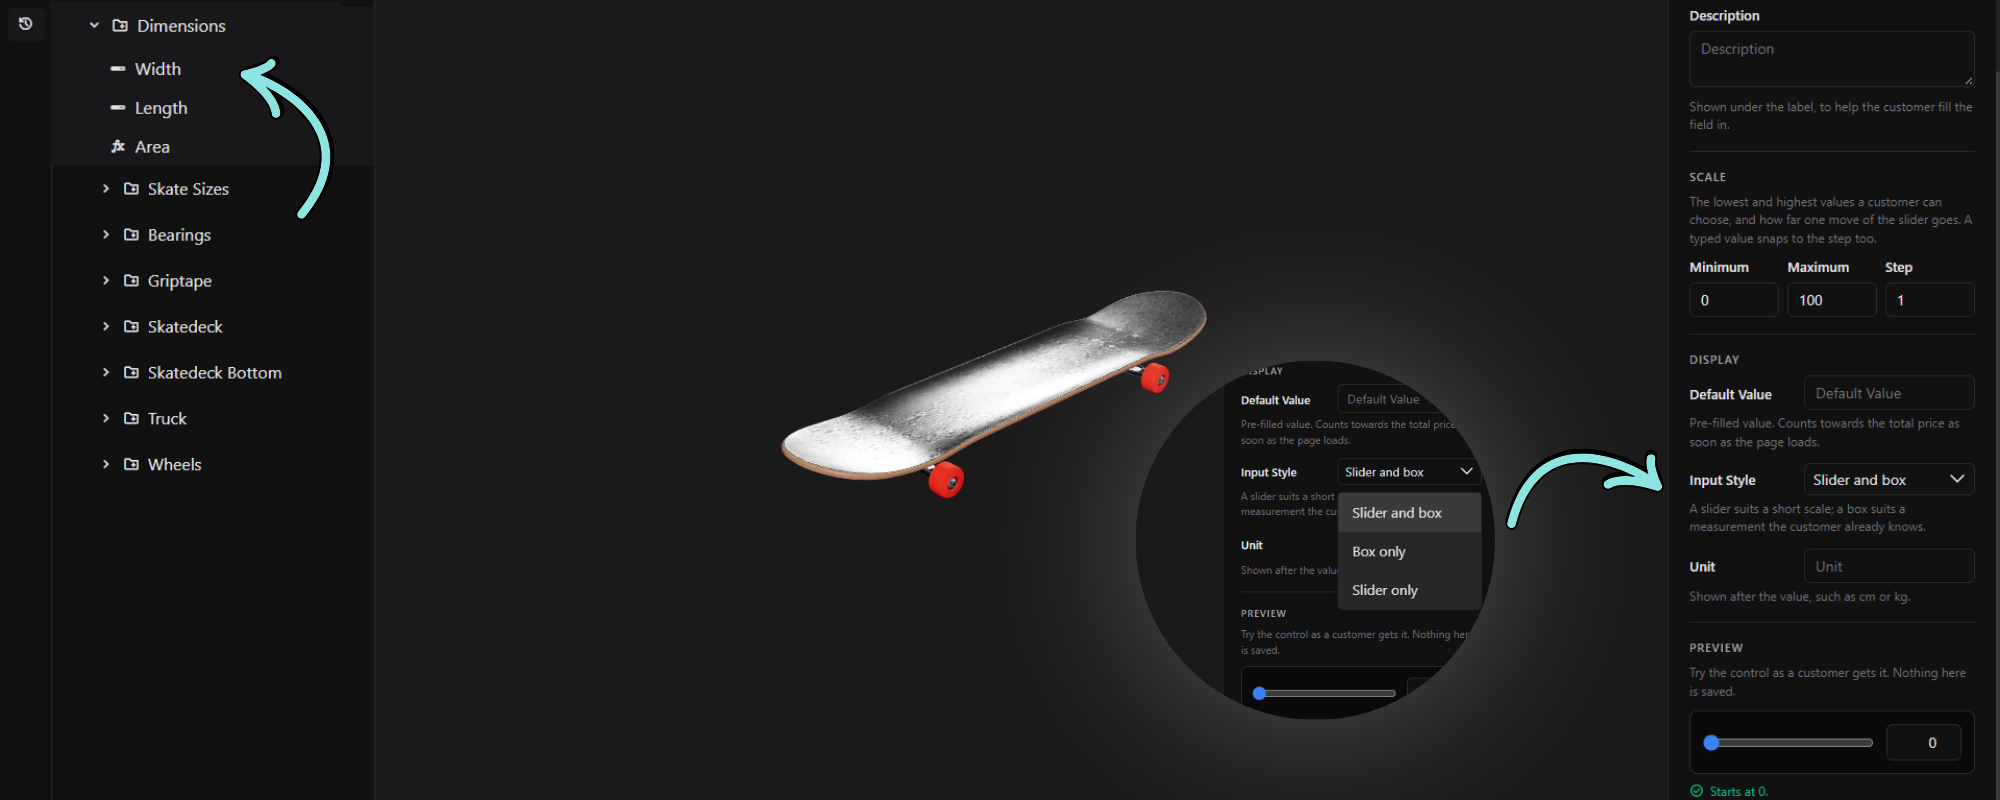
| Setting | What it does |
|---|---|
| Default Value | Where the control starts when the page loads. Leave it empty to start at the Minimum. The starting value counts towards the price straight away. |
| Input Style | Slider and box (the default), Box only or Slider only. A slider suits a short scale. A box suits a measurement the customer already knows, such as a window width in millimetres. |
| Unit | Text shown after the value, such as cm, mm, m or kg. It appears on the page, in the summary, in the cart and in emails. |
You can change the Input Style at any time. It changes how the Range looks, not what it stores or charges.
Preview
The Preview draws the control the way a customer gets it. Drag the slider or type a value to try it. Nothing you do here is saved.
Under the Preview, one line tells you where the control starts, or warns you about a setting the page will adjust:
| Message | What it means |
|---|---|
| Starts at 100 cm. | All good. This is the value the customer sees first. |
| Maximum is below Minimum, so the page swaps them. | The two are the wrong way round. |
| Step has to be more than 0, so the page uses 1. | Enter a Step above 0. |
| Minimum and Maximum are the same, so the slider cannot move. | Widen the scale. |
| Steps of 3 from 0 stop the slider at 99, short of the maximum, 100. | The steps don’t land on the Maximum. |
| 42.5 is not on the scale, so the control starts at 43. | The Default Value isn’t on a step, so it moves to the nearest one. |
| The default is not a number, so the control starts at the minimum, 0. | Enter a number as the Default Value. |
4. Price Settings
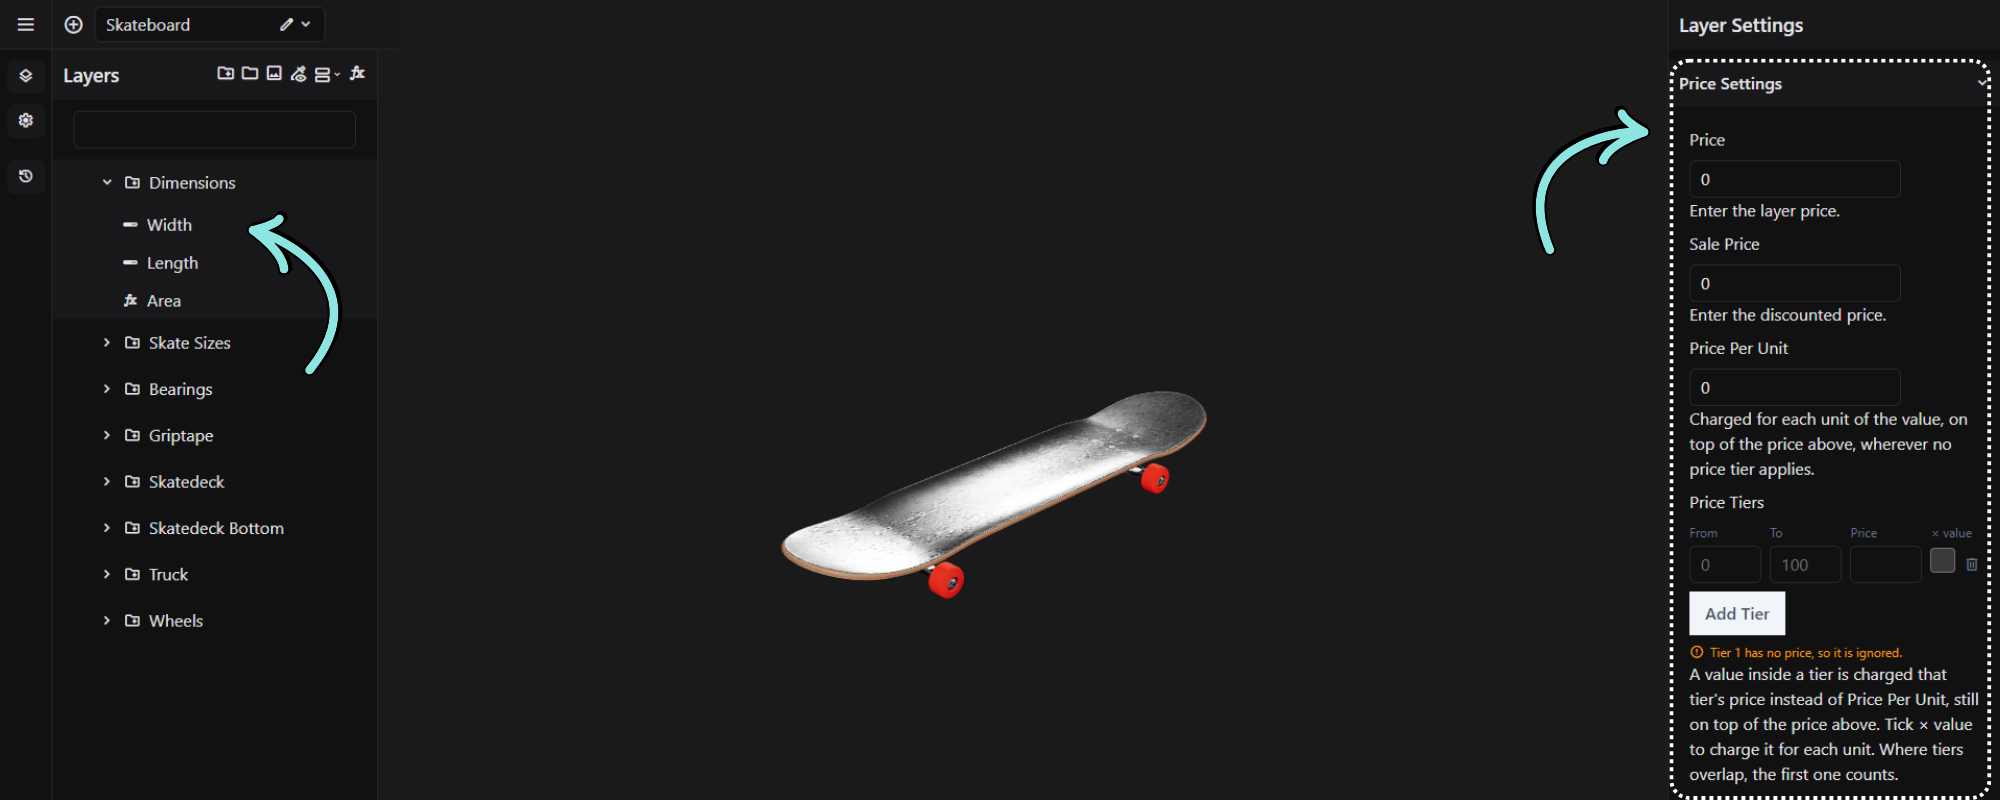
A Range’s prices are in Price Settings, under Layer Settings and above Extra Settings, with the other prices.
| Setting | What it does |
|---|---|
| Price | A flat amount, charged whatever value the customer picks. |
| Sale Price | A discounted flat amount. See Sale prices below. |
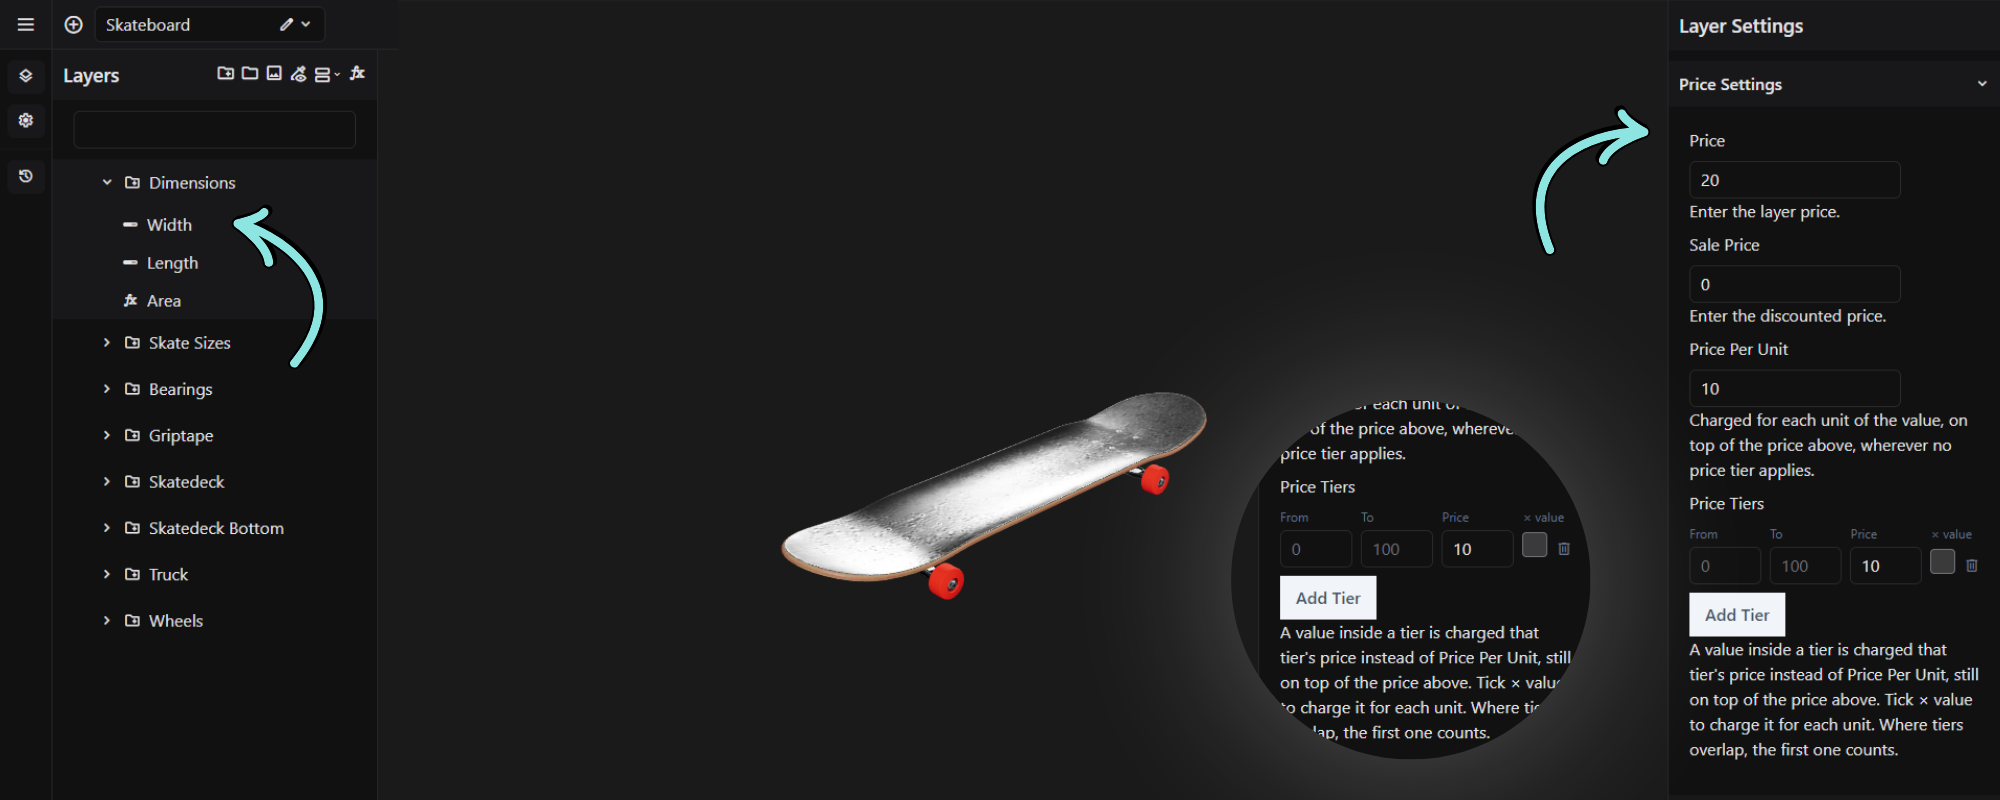
| Price Per Unit | Charged for each unit of the value, wherever no price tier applies. 0.05 per mm at 2400 mm is 120. |
| Price Tiers | Rows that price bands of values. See Price tiers below. |
Price and Sale Price take as many decimal places as your store’s prices. Price Per Unit and the tiers take up to 4.
How a Range is priced
Range price = Price + the charge for the value

The charge for the value is:
  the price of the first tier the value falls in (for each unit, when "× value" is ticked)
  or, when the value is in no tier, value × Price Per Unit
A Range always has a value, so its flat Price is charged at every value, the Minimum included.
Price tiers
Click Add Tier for each band of values. Each row has four parts:
| Part | What it does |
|---|---|
| From | Where the band starts. Leave it empty to start at the Minimum. |
| To | Where the band ends. Leave it empty to run to the Maximum. |
| Price | What a value in the band costs. |
| × value | Tick it to charge the Price for each unit, instead of once. |
From and To are both included in the band. An empty From or To shows the Minimum or the Maximum as a hint. The bin icon at the end of a row removes the tier.
How the tiers are read:
- The first row the value falls in wins. Where rows overlap, the one higher in the list counts.
- Outside every row, Price Per Unit applies to the whole value.
- A row priced 0 is a free band.
- A row with no Price is ignored.
- The flat Price is always added on top of the tier.
- Up to 50 rows count.
With no rows, the editor says “No tiers yet, so Price Per Unit prices every value.” It also warns you when the rows don’t price the way they read:
| Warning | What to do |
|---|---|
| Tier 2 has no price, so it is ignored. | Enter a Price, or remove the row. |
| Tier 2 starts above where it ends, so no value reaches it. | Swap From and To. |
| Tier 3 is outside Minimum and Maximum, so no value reaches it. | Change the row, or the scale. |
| Tiers 1 and 2 overlap, and a value in both gets tier 1. | Make the rows meet without overlapping, unless the overlap is what you want. |
| 100.5 cm is in no tier, so Price Per Unit prices it. | Start each row one step after the previous one ends. Or leave the gap on purpose, for Price Per Unit to price. |
Tip: With a Step of 1, rows of 0–100 and 101–200 meet exactly. With a Step of 0.5, start the second row at 100.5.
Sale prices
A sale price counts only when it’s lower than the Price. When a Range has one, the charge for the value is added to both prices, and the customer pays the sale figure.
For example, with a Price of 10, a Sale Price of 8, a Price Per Unit of 2 and a value of 5, the regular price is 20 and the sale price is 18. The customer pays 18.
5. Pricing examples
Sold by the metre, with a cutting fee
- Scale: Minimum 1, Maximum 20, Step 0.5. Unit:
m. - Price: 5. Price Per Unit: 12.50.
- Gives: 4.5 m costs 5 + 4.5 × 12.50 = 61.25, and 1 m costs 17.50. A customer who types 4.3 gets 4.5, the nearest step, at 61.25.
Price bands
Scale: Minimum 0, Maximum 300, Step 1. Unit: cm. Price Tiers:
| From | To | Price | × value |
|---|---|---|---|
| 0 | 100 | 20 | |
| 101 | 200 | 35 | |
| 201 | (empty) | 50 |
With these rows, 80 cm costs 20, 150 cm costs 35, and 250 cm costs 50.
Volume pricing
Scale: Minimum 1, Maximum 100, Step 1. Price Tiers, each with × value ticked:
| From | To | Price | × value |
|---|---|---|---|
| 1 | 9 | 10 | ✓ |
| 10 | 49 | 8 | ✓ |
| 50 | (empty) | 6 | ✓ |
5 units cost 50, 12 units cost 96, and 60 units cost 360.
The first 10 free
- Scale: Minimum 0, Maximum 50, Step 1. Price Per Unit: 2.
- Price Tiers: From 0, To 10, Price 0.
- Gives: 8 units cost nothing. 15 units cost 30.
Outside the free band, Price Per Unit prices all 15 units, not just the 5 above 10. To charge only for the units above 10, leave the Range unpriced and add a Formula that reads it: max(0, {qty} - 10) * 2. That gives 10 for 15 units. See the Formula Layer.
6. What the customer sees
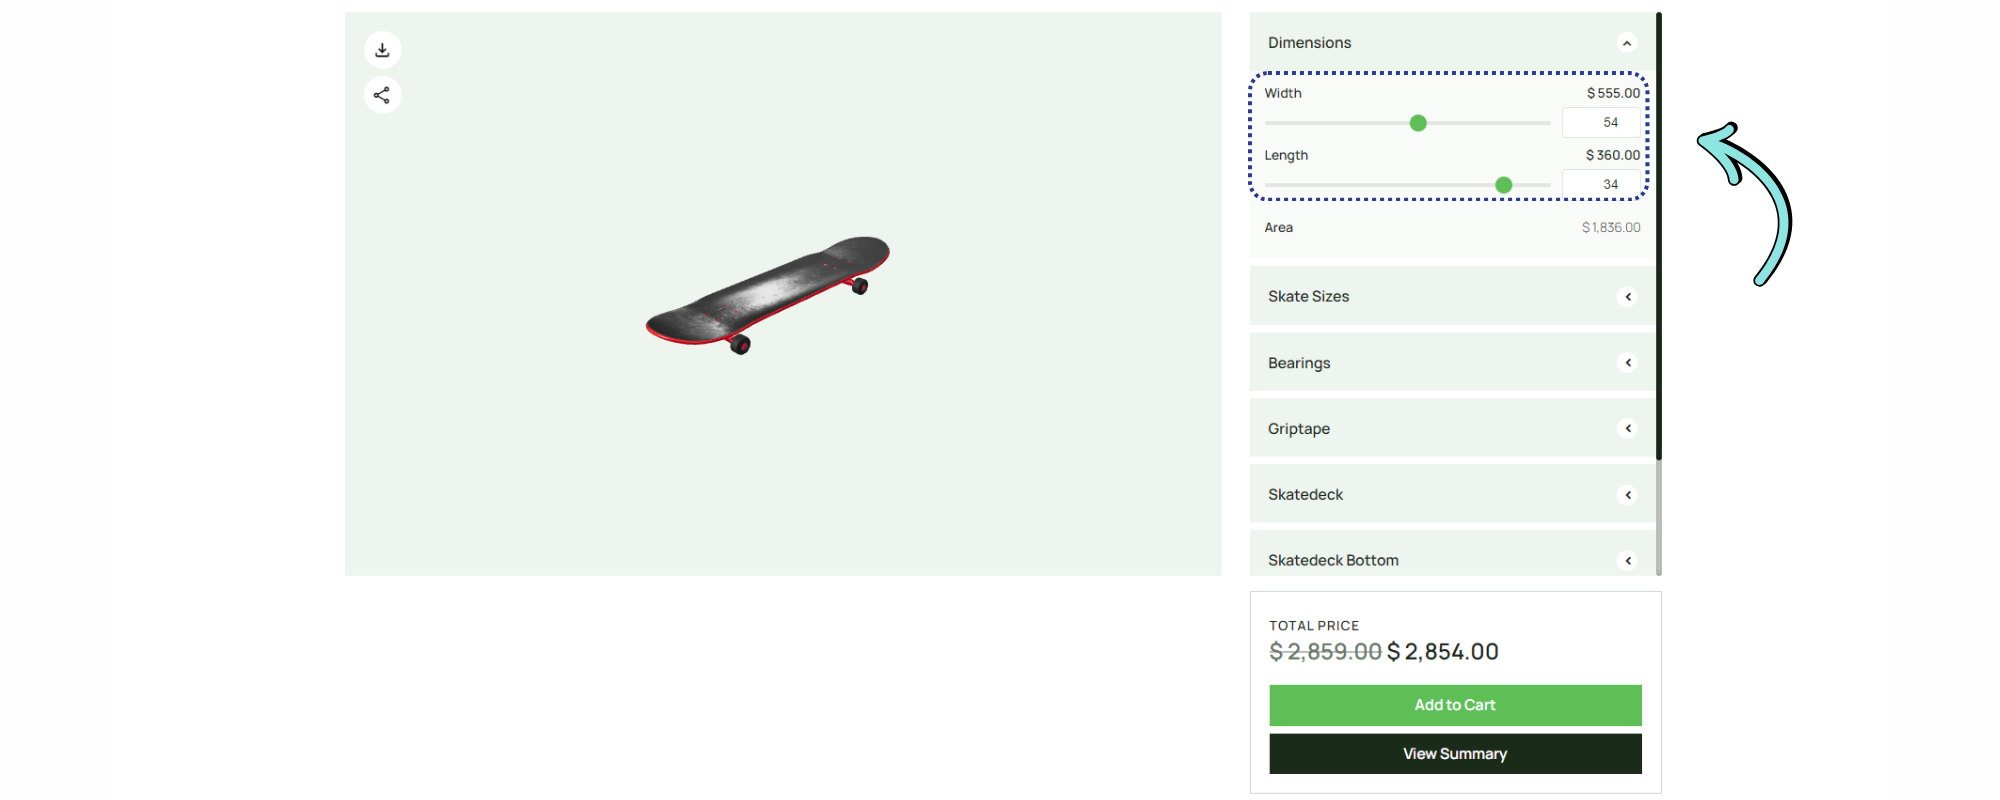
- The label, with the Range’s current price beside it. The price follows the value, and doesn’t show while the value costs nothing.
- The description, when you’ve written one.
- The slider, the box, or both, followed by the unit.
As the customer drags the slider, the number follows it, and the total keeps up as they go. A number typed into the box is checked when they press Enter or leave the box: it moves to the nearest step and inside the scale, and the slider and the box both show the corrected number. The slider also moves with the arrow keys.
A Range counts from the moment the page loads, at its Default Value or its Minimum.
7. In the summary, the cart and emails
- Summary popup: the Range is listed under its group, with its value and unit, such as “Value: 2400 mm”, and its price.
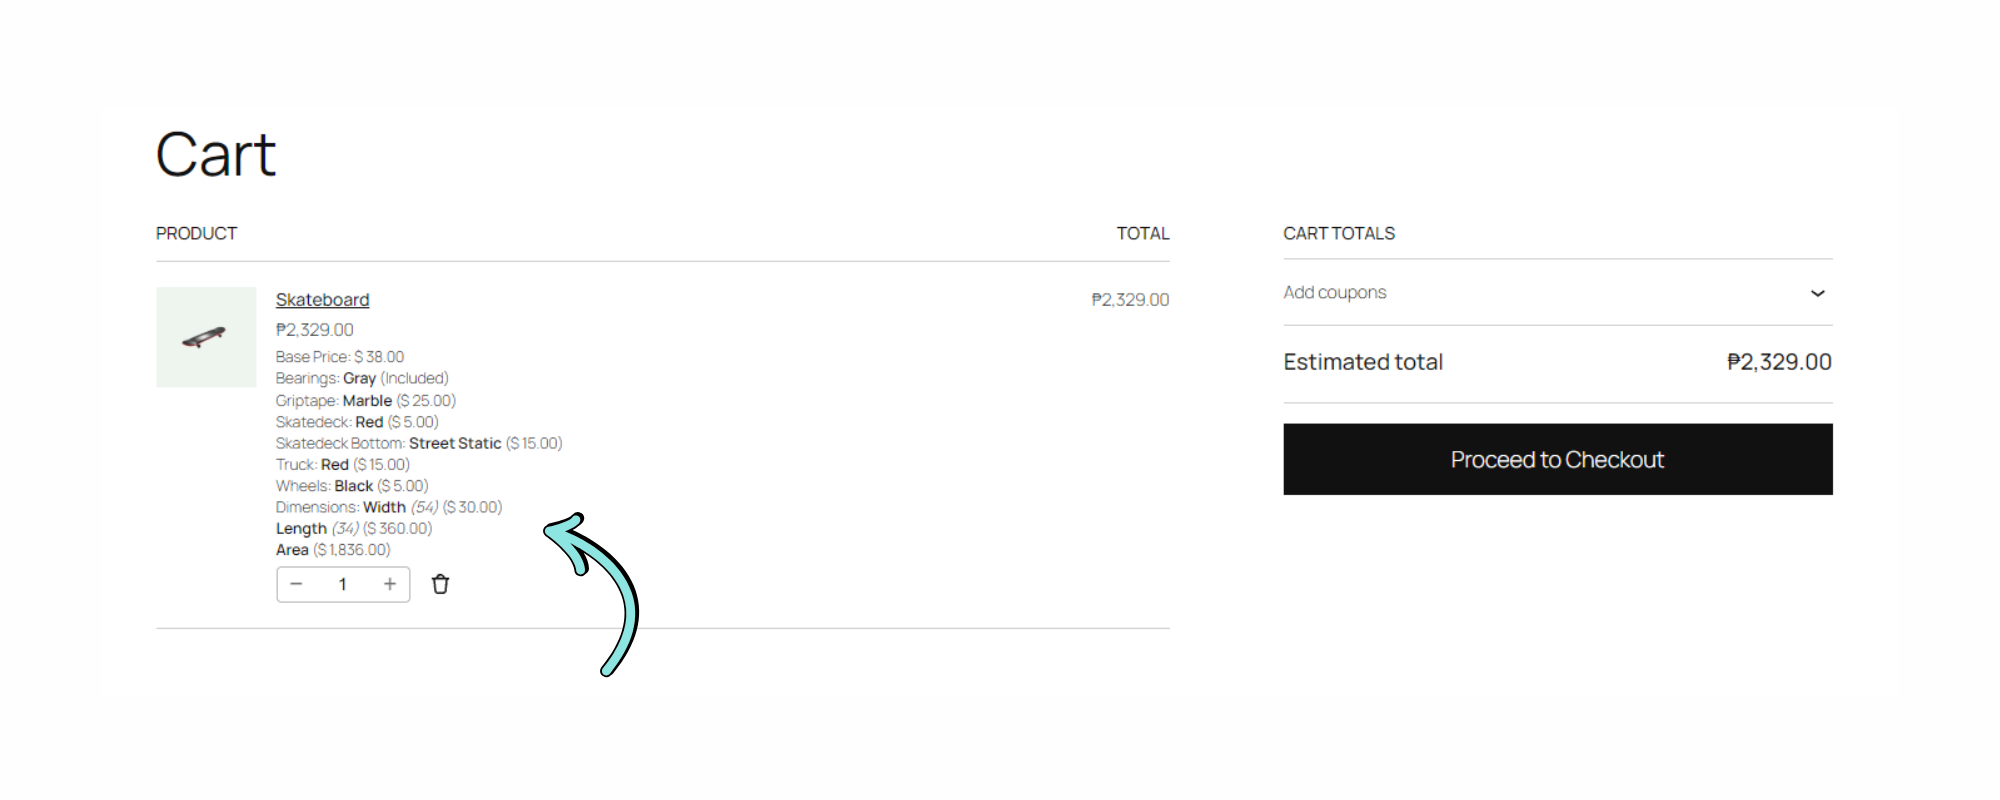
- Cart, checkout, orders, emails, the PDF and the invoice: the Range reads as its layer name, its value and its price, such as “Width (2400 mm) ($120.00)”. A Range that costs nothing shows no price: “Width (2400 mm)”. A value of 0 is shown as 0.
- Shared and saved configurations open with the Range at the value it was set to.
Your store works the price out again when the customer adds to cart or asks for a quote, from the value they chose. Editing the page can’t change what they pay: a value off the scale is charged as the nearest value on it.
8. Use a Range in a Formula
A Formula can read a Range’s Value, the number on its scale, or its Price, what it costs right now.
For example, with Width and Height Ranges in millimetres, a Formula that reads both and computes {width} * {height} / 1000000 * 45 charges 45 per square metre. At 1200 × 1500 mm, that’s 81.00.
Turn on the Formula module first. See the Formula Layer.
9. Use a Range in Conditional Logic
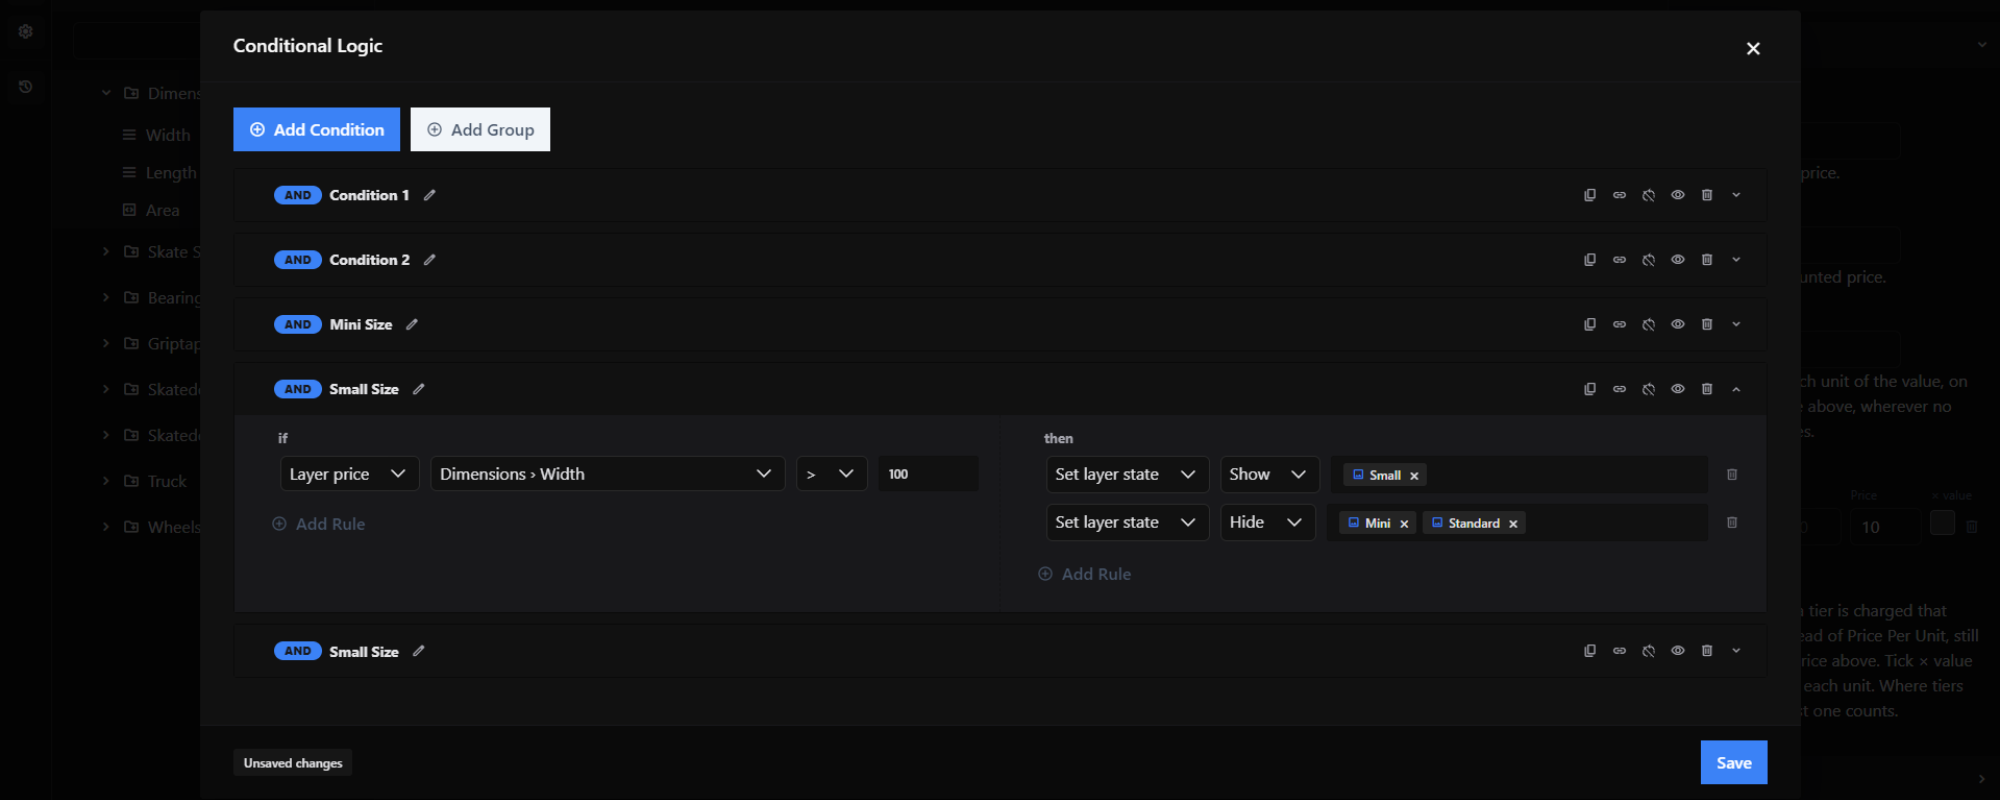
With the Conditional Logic module on, a rule can test a Range:
- Layer value compares the Range’s number, using
=,≠,>,<,≥or≤. Decimals are fine. - Layer price compares what the Range costs at the moment.
Example:
IF
Size › Width > 1200

THEN
Show Reinforcement bar
A rule sees the number after snapping, the same number the customer is charged for.
A Range can also be the target of a rule: Show, Hide, Enable or Disable it. A disabled Range is dimmed and can’t be changed.
Note: A hidden or disabled Range keeps its value. It still counts towards the total and still appears in the cart. To charge only in some cases, put that logic in a Formula instead.
10. Good to know
- A Range always has a value. It can’t be left empty, so it has no Required setting.
- Its flat Price is charged at every value. To make a Range optional, start it at 0 and price it only per unit or with tiers, so 0 costs nothing.
- It doesn’t change the 3D model. A Range sets a number and a price.
- Its settings travel with the page, like every layer’s settings. Don’t put anything private in them.
- Turning off Custom Fields removes every Range from your configurators’ pages and prices. Turn it back on and they return as they were.
- Range is a Pro feature. The Lite version doesn’t include it.
11. Troubleshooting
| What you see | Why, and what to do |
|---|---|
| There’s no Range icon in the editor. | Turn on the Custom Fields module (section 1). Range needs the Pro version. |
| The slider doesn’t reach the Maximum. | The steps don’t land on it. Check the Preview, and make Maximum − Minimum a whole number of steps. |
| A typed value changes when the customer leaves the box. | It moved to the nearest step, or inside the scale. This is the value they’re charged for. |
| No price shows beside the label. | The value costs nothing, or the Range has no price, Price Per Unit or tier. |
| The price isn’t what you expected. | The first matching tier wins, the flat Price is always added, and outside every tier Price Per Unit prices the whole value. A lower sale price is what the customer pays. |
| The Range starts somewhere unexpected. | Check the Default Value. The Preview says where the control starts. |