Are you a 3D artist? This guide is for shop owners setting up the layer in WordPress. If you are preparing the GLB model itself (sticker mesh, UVs, transparency), start with Preparing a Model for Custom Image Upload (Blender) first.
The Custom Image Upload layer lets shoppers upload their own image (a logo, photo, or artwork) and see it applied directly onto your 3D model in real time. Shoppers can scale, rotate, and drag the image into position on the model’s printable area before applying it.
It is ideal for jerseys, mugs, caps, packaging, phone cases, and any product where customers want to add their own design.
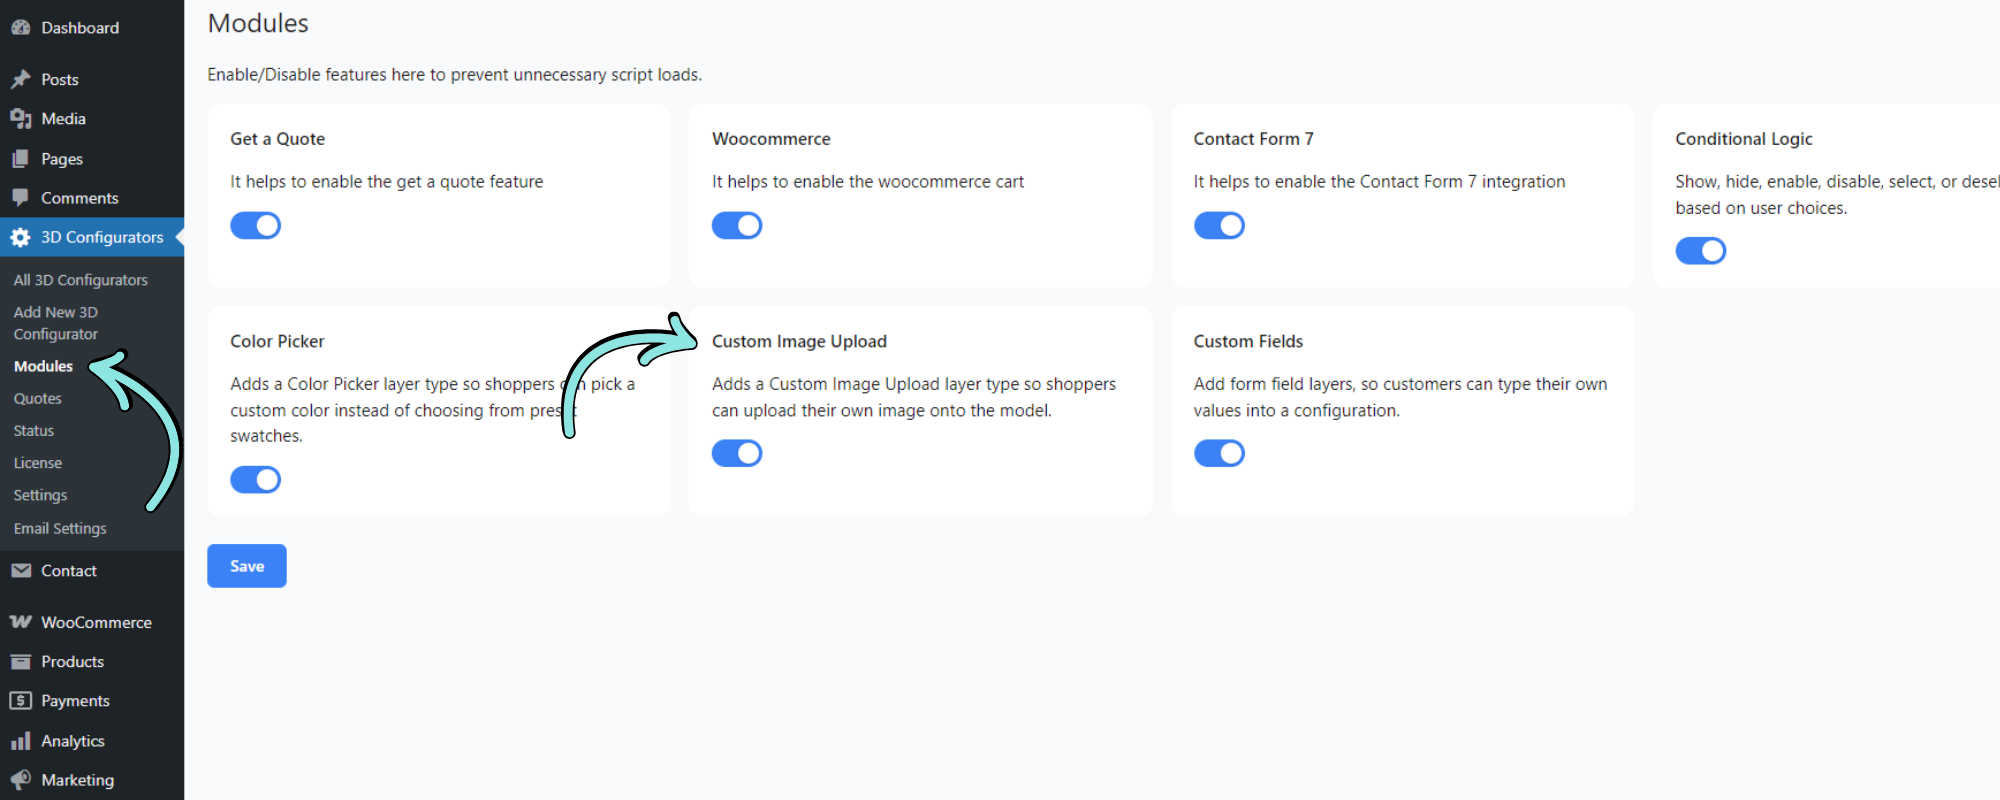
1. Enable the Custom Image Upload Module
Before you can add a Custom Image Upload layer, the module must be enabled.
- From your WordPress dashboard, go to 3D Configurators → Modules.
- Locate the Custom Image Upload module.
- Turn on the toggle.
- Click Save.
Note: The module must be enabled before the Custom Image Upload layer type appears in the editor.
2. Add a Custom Image Upload Layer
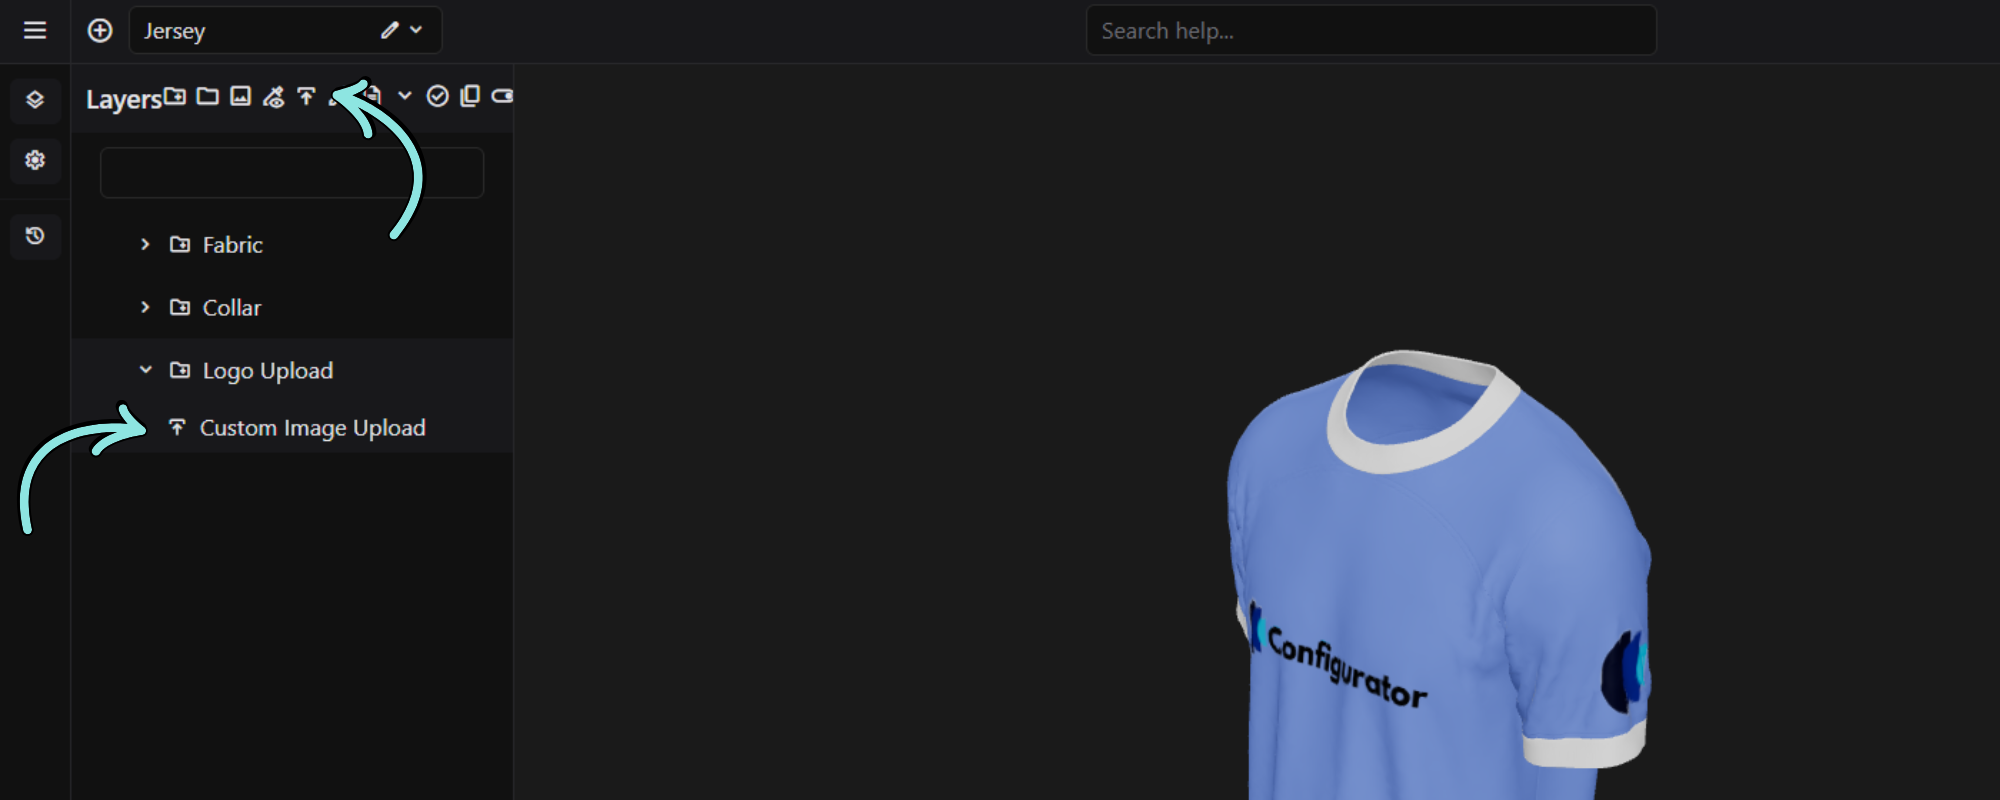
- Open your 3D Configurator in the editor.
- In the Layers panel, click the Custom Image Upload icon (the upload arrow) in the toolbar beside the Layers heading.
- A new Custom Image Upload layer is added to the Layers list.
- Select the layer to open its options in the Layer Settings panel on the right.
Tip: Place the layer inside a Group layer (for example, Logo Upload). The group name becomes the section title shoppers see on the product page.
3. Custom Image Upload Layer Settings
These are layer settings. Select the Custom Image Upload layer, then open the Custom Image Upload section in Layer Settings.
| Setting | Description |
|---|---|
| Target Mesh(es) | The mesh (or meshes) where the shopper’s image is applied. You can pick multiple meshes to show the same logo in many places. See section 4. |
| Mask (SVG) | Optional. Changes how the image is applied to the mesh. See section 5. Click Upload to add a mask, or the red × on the preview to remove it. |
| Image Guidelines | Generated automatically. See the note below. |
| Allowed Formats | File types shoppers may upload: JPG, PNG, WEBP. Click the × beside a format to remove it. |
| Max Upload Size (MB) | Largest file a shopper can upload. Default: 5 MB. |
| Required | When on, the shopper must upload an image before continuing. When off, the upload is optional. |
Note: Image Guidelines are auto-generated. The plugin automatically extracts the compatible image size and resolution from your GLB model and shows them to shoppers as the recommended values for their upload. You do not need to work these out or type them in yourself.
The layer also has Price Settings and Extra Settings sections above the Custom Image Upload section.
4. Target Mesh(es): Layer Setting vs Group Setting
The Target Mesh(es) setting appears in two places, and they are different:
| Group layer | Custom Image Upload layer | |
|---|---|---|
| Purpose | Used by option layers inside the group | Tells the upload layer where to place the shopper’s image |
| Where to set it | Group layer settings | Custom Image Upload layer settings |
For Custom Image Upload layers, you do not need to set Target Meshes on the group layer. Set the target meshes on the Custom Image Upload layer itself.
Applying the logo in many places
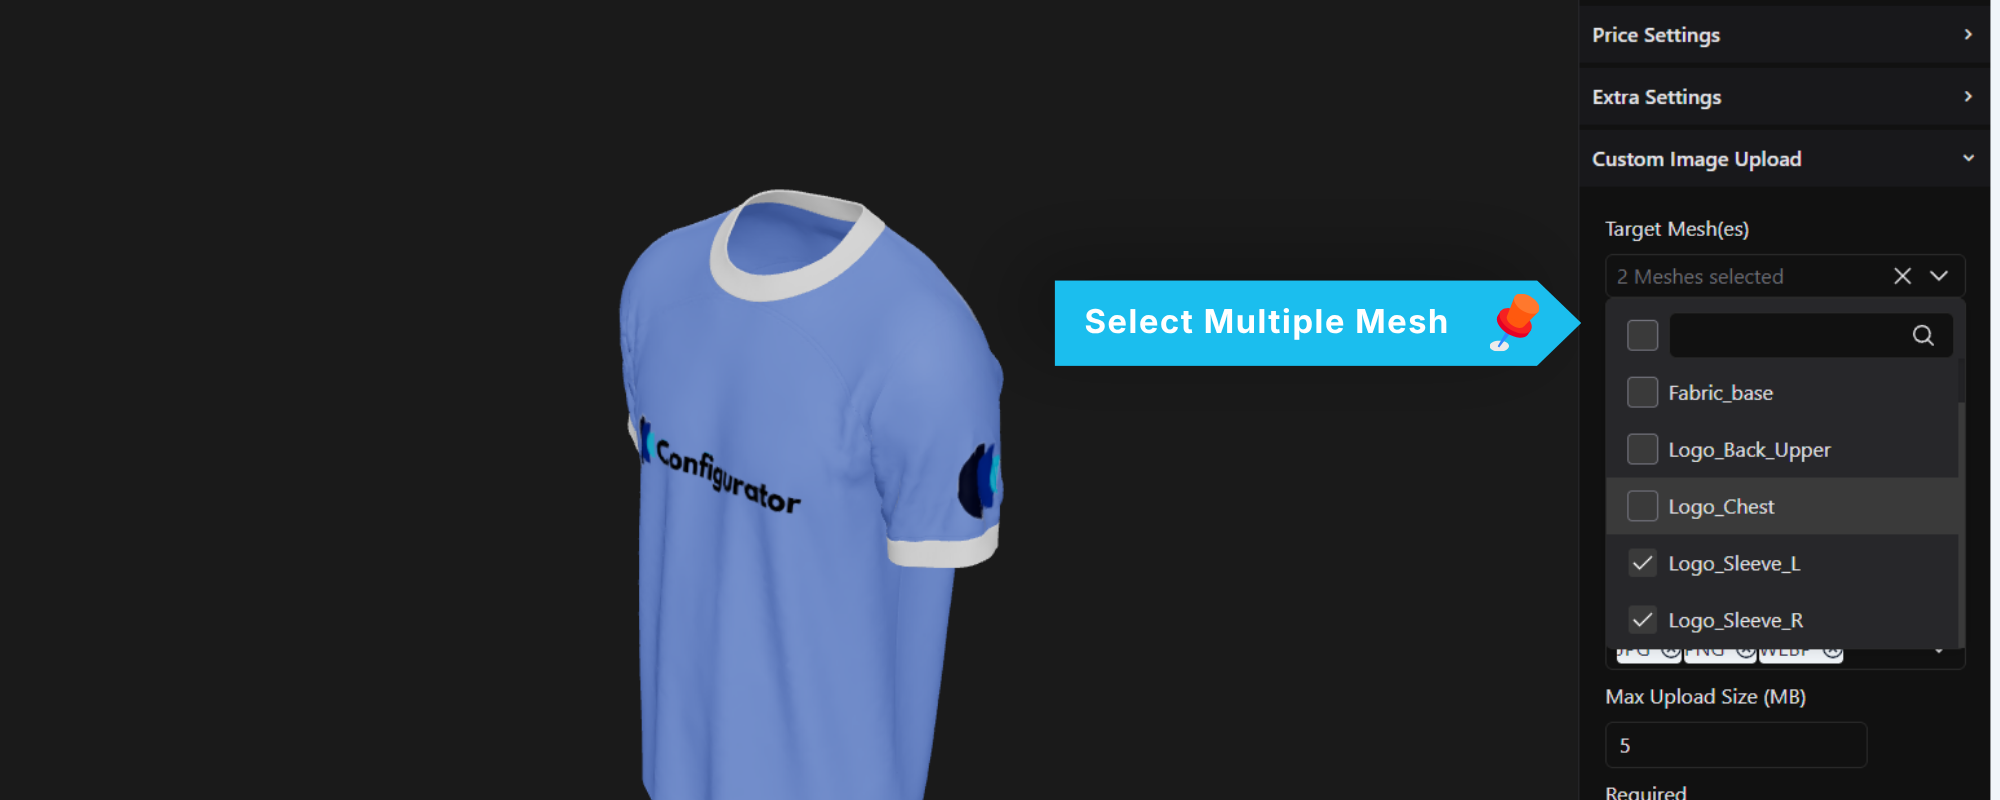
You can pick more than one mesh in the Custom Image Upload layer’s Target Mesh(es) field. The shopper’s image is then applied to every selected mesh, which is useful when the logo should appear in several places, such as both sleeves and the chest of a jersey.
- Select the Custom Image Upload layer.
- Open Target Mesh(es) in Layer Settings.
- Select every mesh that should show the image. The field shows the count, for example 2 Meshes selected.
- Click Save.
If you want shoppers to upload different images for different areas, add a separate Custom Image Upload layer for each area.
5. Mask (SVG): Optional
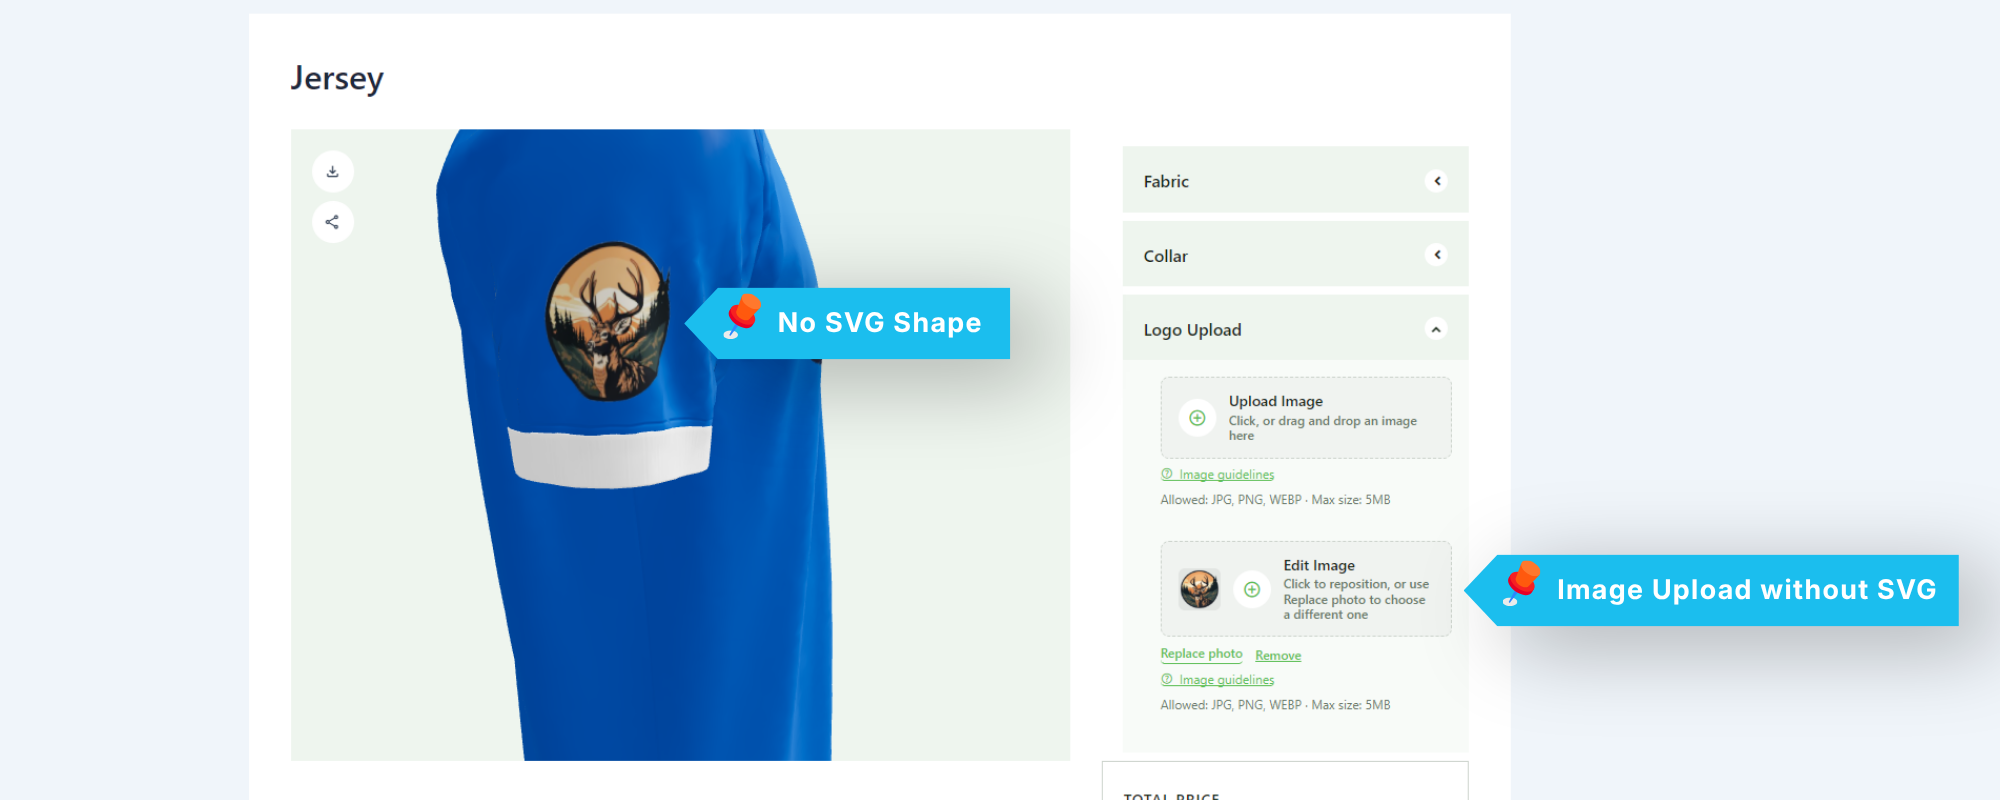
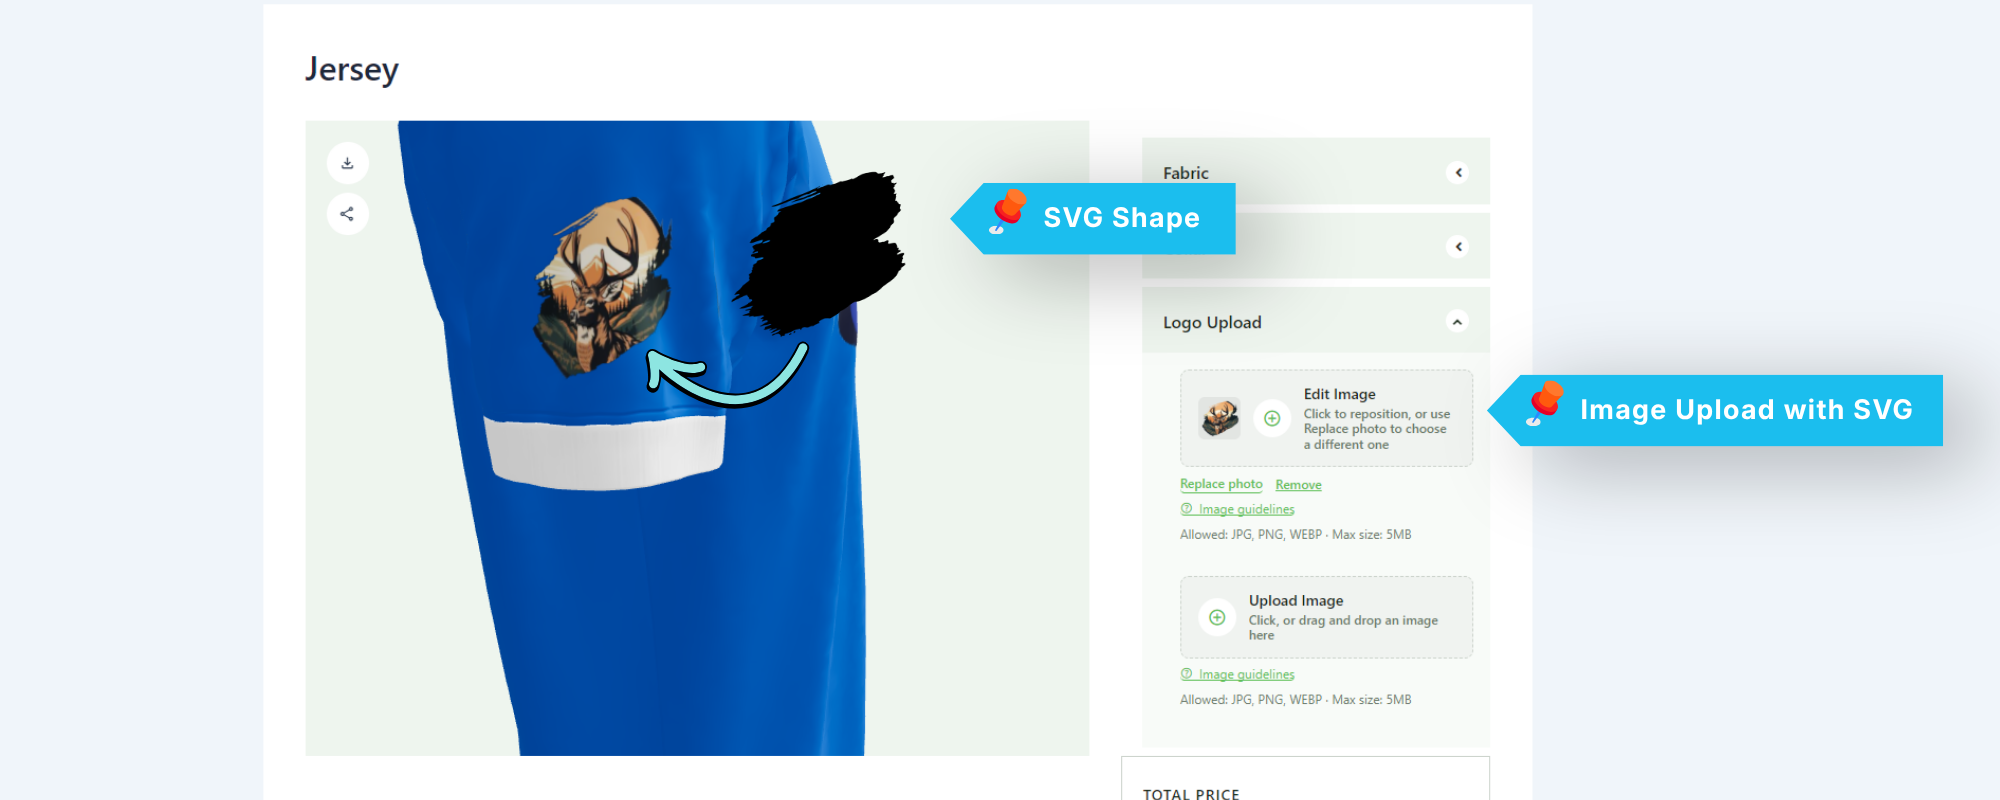
A mask is not required. The Custom Image Upload layer works without one. Adding a mask changes how the image is applied:
| Without a mask | With a mask (SVG) | |
|---|---|---|
| How the image is applied | The uploaded image replaces the image area on the mesh. It does not wrap around the mesh. | The uploaded image wraps around the full mesh. |
| Best for | Flat areas such as a chest logo or a label. | Curved or wrapped surfaces, or when the image should follow the whole mesh. |
Before and after
Before (no mask): the image sits in the mesh’s image area and is not wrapped around the mesh.
After (with mask): the same image wraps around the entire mesh.
Mask file tips
- Use an SVG file with a simple, closed shape.
- Keep the file small and remove unused layers or metadata before uploading.
6. The Shopper Experience (Front End)
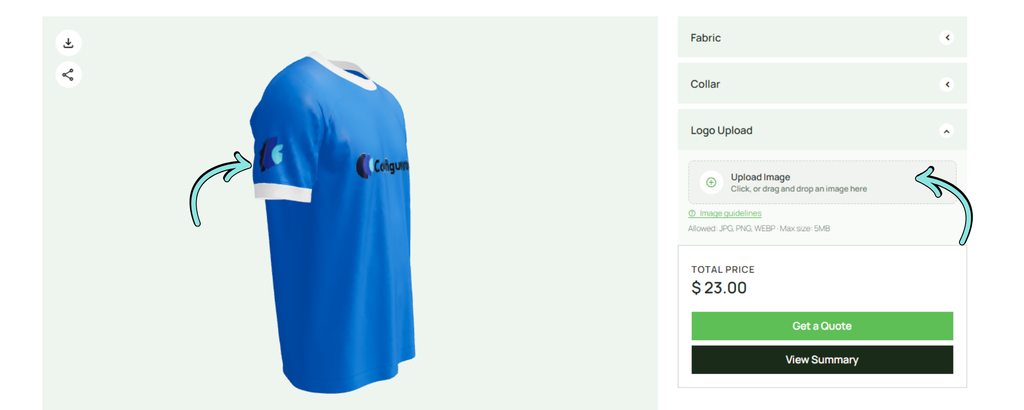
On the product page, the Custom Image Upload layer appears inside its group (for example, Logo Upload).
Uploading an image
- Open the group (for example, Logo Upload).
- Click the upload area and choose an image from your device.
- The Position Your Image popup opens.
- Scale, rotate, and drag the image into position, then click Apply.
After the image is applied
The upload area shows a thumbnail and these options:
| Element | What it does |
|---|---|
| Edit Image (thumbnail area) | Click to reopen the popup and reposition the image. |
| Replace photo | Choose a different image file. |
| Remove | Delete the image from the product. |
| Image guidelines | Shows the recommended size and resolution, generated from your GLB model. |
| Allowed / Max size line | Shows accepted formats and file size limit, for example Allowed: JPG, PNG, WEBP · Max size: 5MB. |
The image appears on the 3D model immediately, so shoppers can rotate the model and check the result before buying.
7. Position Your Image Popup
After choosing a file, shoppers see the Position Your Image popup. Here they can scale, rotate, and drag the image to place it within the area that the GLB model uses for the image.
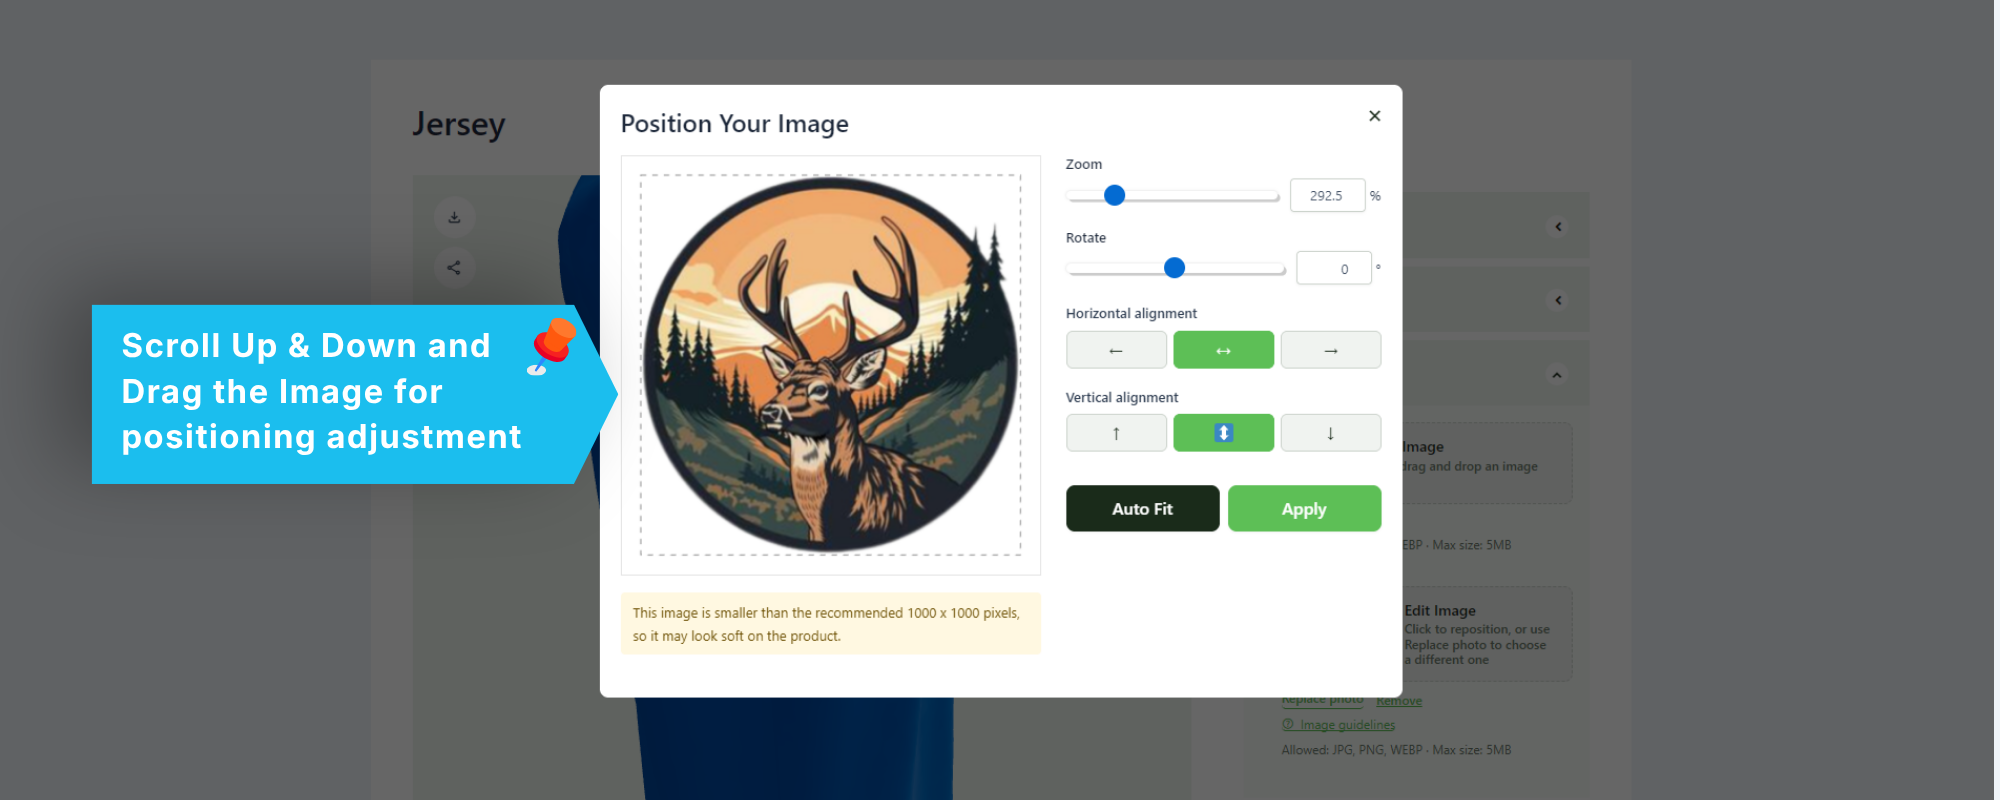
| Control | What it does |
|---|---|
| Zoom | Slider and percentage field. Scales the image up or down. |
| Rotate | Slider and degree field. Rotates the image to any angle. |
| Drag | Click and drag the image in the preview to move it (X and Y position). |
| Horizontal alignment | Left, Center, or Right buttons snap the image to that side. |
| Vertical alignment | Top, Middle, or Bottom buttons snap the image to that edge. |
| Auto Fit | Automatically resizes and centers the image to fit the area. |
| Apply | Confirms the position and places the image on the 3D model. |
| × (close) | Closes the popup without applying changes. |
Low-resolution warning: If the uploaded image is smaller than the recommended size, a notice appears under the preview: “This image is smaller than the recommended 1000 x 1000 pixels, so it may look soft on the product.” The shopper can still apply the image, but it may look blurry.
Tip for shoppers: Click Auto Fit first, then fine-tune with Zoom, Rotate, and drag.
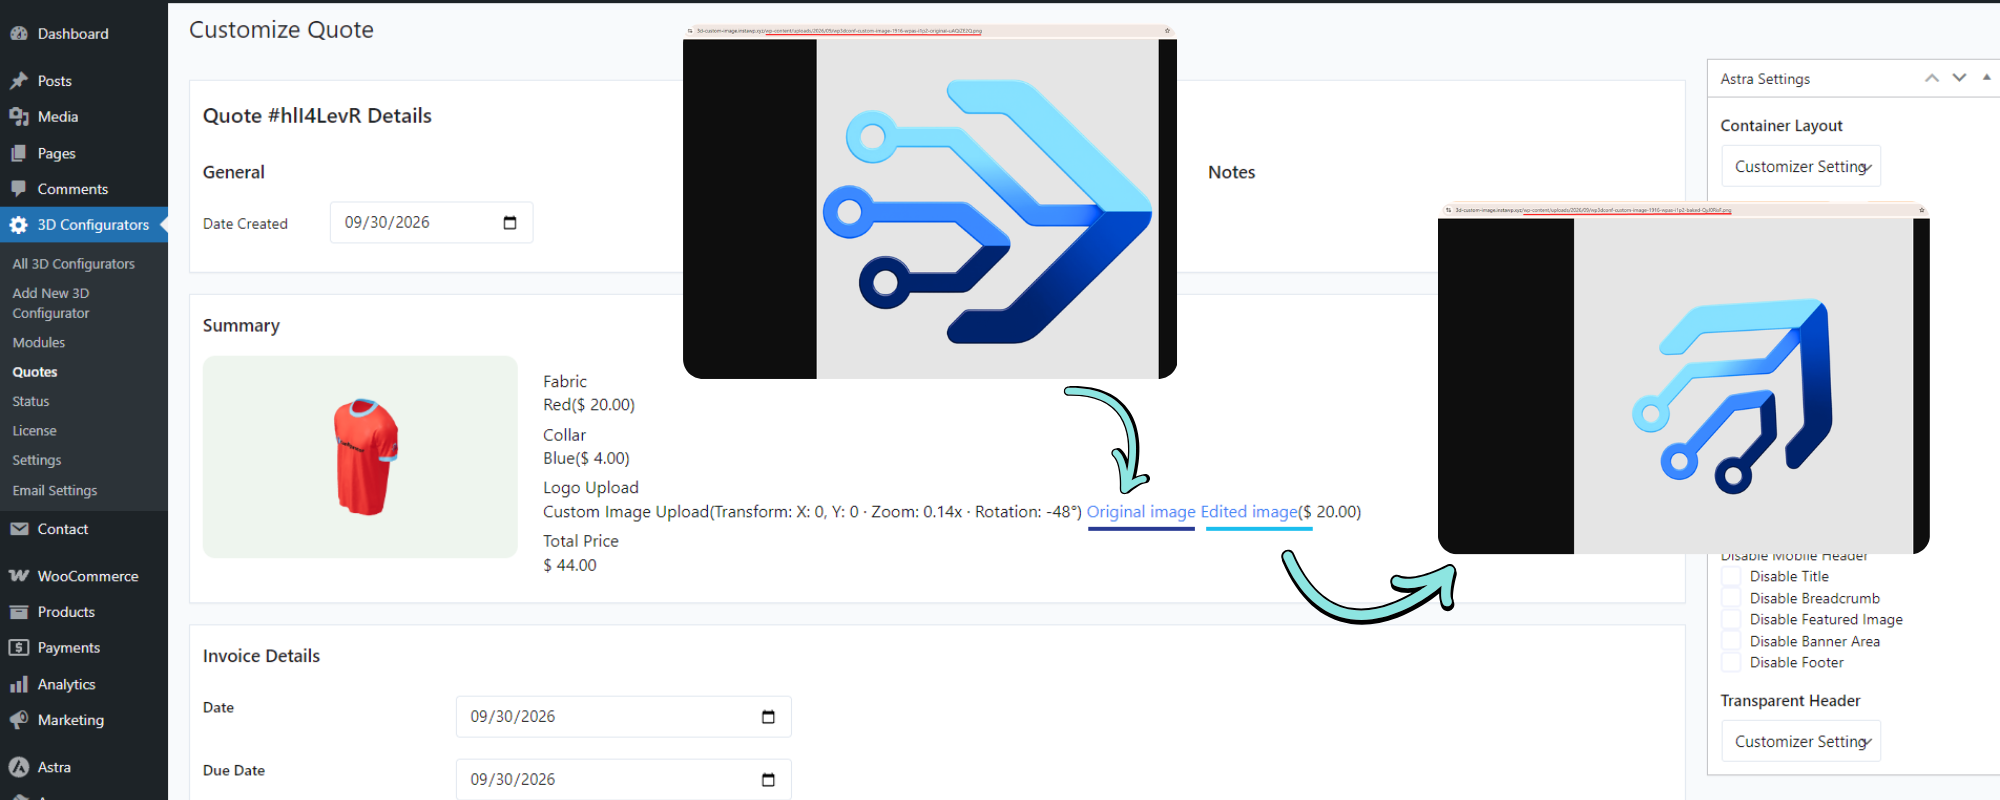
8. What the Admin Receives
For every order with an uploaded image, the admin receives everything needed for printing:
- The original uploaded image: the untouched file the shopper uploaded.
- The edited image: the image as the shopper positioned it, for reference.
- The transform values: the exact settings the shopper used.
| Transform value | Meaning |
|---|---|
| Scale | How much the shopper enlarged or reduced the image. |
| Rotate | The rotation angle applied to the image. |
| X position | Horizontal position of the image. |
| Y position | Vertical position of the image. |
These values help production and print teams reproduce the shopper’s exact placement from the original file.